


Almost all industries in India today have epoxy/PU floorings in their plant area to provide seamless, joint-less, aesthetic, chemical-resistant, hygienic, dust-free atmosphere. An overall survey will indicate that not all users are happy with the result. Many of the users express that they experience a variety of problems such as de-bonding, bubbling, scratches, uneven surfaces and so on and expressed concern regarding its durability. This article aims to address many of these issues related to selection, execution and after-care of epoxy/PU floorings to minimize these instances, though not eliminate them. The studies indicated that about 20% of the problems were due to wrong selection of material/thickness, 60% due to wrong application and 20% due to poor quality of the products.
Hence it is important to divide the discussion into three parts:
- Pre-installation guide-lines
- Installation procedures
- Post-installation practices
Pre-installation guidelines
A) Selection of the right product: Whether Epoxy or PU, solvent-borne or water-borne systems are suitable for a specific application has been dealt with by various authors before me and hence am not addressing in this article. The major difference between epoxy & PU systems is that PU is more flexible and hence is more suitable in high-impact areas.
B) Selection of right thickness: It is very important to arrive at the correct thickness of flooring to provide optimum service to the required traffic conditions. Higher the thickness, higher the durability, but higher the cost. Hence it is pertinent to calculate the right thickness.
a. How do you calculate the right thickness? Engineer Curt Augustsson, in his Epoxy handbook, gives the following guideline:
b. First calculate the maximum load distribution of the moving load, say Forklift. The customer will give you the info as to the max load of the Fork lift including the deadweight say 3000 Kg. Find out the contact area of the wheel on the floor. (Keep a white paper on the floor under each wheel and draw the contact area of all the wheels.) Let us assume that it works out to 5 cm2. Then load distribution works out to 3000/5 = 600 Kg/cm2. If the grade of concrete is M25 (comp. strength of 250 Kg/cm2 ), then the load factor is 600 divided by 250 equals to 2.4. Check the graph below, go to 2.4 on the vertical axis and you will arrive at 3mm for the floor thickness.

C) Analysis of requirements: This is the most important part of the process for the selection of the right product as well as the right application methods. A single product cannot meet all the requirements and hence the customer has to allot a priority for each requirement. The following table gives empirical selection criteria ( based on our experience in assessing various industrial requirements). Light duty flooring can be laid from 500 microns to 1mm, Medium duty at 1mm to 2mm and heavy-duty varies from 3mm to 6mm.
| Priority Rating for typical traffic type | Heavy Duty | Medium Duty | Light Duty |
|---|---|---|---|
| Resistance to wear | 1 | 1 | 9 |
| Resistance to Impact & static loading | 2 | 2 | 10 |
| Ease of Maintenance | 3 | 3 | 8 |
| Resistance to penetration of oil, grease etc | 4 | 4 | 11 |
| Cleanability | 5 | 9 | 5 |
| Chemical resistance | 6 | 5 | 6 |
| Anti-slip/Anti-stain resistance | 7 | 7 | 7 |
| Flammability & Fire safety | 8 | 11 | 12 |
| Scratch/scuff resistance | 9 | 8 | 4 |
| Hygienic/anti-bacterial (seamless) | 10 | 12 | 3 |
| Aesthetics | 11 | 10 | 2 |
| Dust-protection | 12 | 6 | 1 |
All the above parameters can be said to resist the following four broad categories:
- Mechanical effects: Static and dynamic loads, abrasion, impact, vibration, skidding, conductive or anti-static etc.
- Chemical effects: Oil, grease, chemicals, soluble salts, cleaning agents, solvents
- Environmental effects: Thermal exposure such as heat or cold, UV and other weather conditions, noise etc.
- Biological effects: Bacterial impact
D) Pre-installation checks:
a. Check List: This is the most important step in ensuring that the final floor meets or exceeds the expectations of the customer.
- Check the type of floor – Mosaic / Concrete/ Tile / Stones / Marble . (If so, level of polish)
- If concrete, any floor-hardener, curing agent etc have been used?
- Check the soundness of the floor by hammer/scratching the surface with a coin etc.
- Check the porosity of the concrete by putting a few drops of water and check for beading etc
- Check the level-differences/undulations on the floor
- Check for oil spillage, grease or any other contaminants
- Check for moisture content preferably under plant operating conditions
- Check for ingress of water through’ Roof/Wall cracks and floor joints
- Any chemical/solvent spillage & its concentration, temperature etc
- Any possibility of steam impingement xi. Type of traffic envisaged and the condition of material handling equipment (type of wheel etc)
- Any cracks/pot holes
- Understand customer’s expectations xiv. Estimate the job correctly by preferably measuring the area.
b. Moisture testing:
i. Moisture in the concrete or rising moisture from sub-soil has been the single most contributing factor for failure due to bubbles. Moisture doesn’t just mean water droplets, it could include high humidity. Some coatings shouldn’t be applied when humidity levels are high. More obvious sources of serious moisture are things like rising moisture through the concrete pores, the higher moisture content in new concrete, standing water puddles on a concrete slab, or, even more likely, a damp or even saturated surface.
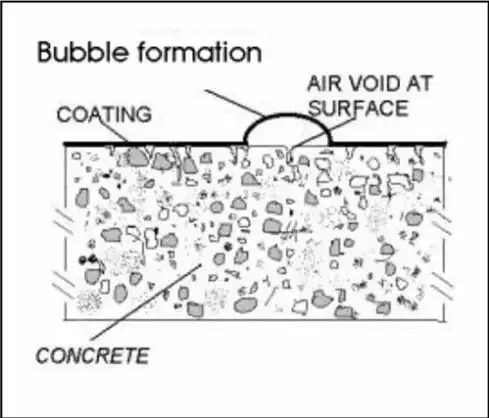
ii. Surface dry doesn’t mean dry. Surface moisture content can be measured utilizing a hand-held moisture meter and the thumb-rule is that the moisture content shall be less than 5% to allow impermeable coatings to be laid. However, surface moisture is only an indicative test and not sufficient to test rising moisture.
iii. There can be (and often is) a high moisture content hidden just below the surface. The standard test is to tape a four-foot by four-foot plastic sheet to the concrete and see if visible moisture collects under the plastic. Some of the modern epoxies can be applied to wet or damp surfaces but generally, a moisture-rich surface means no possibility of coating.
c. Check for oil/grease: Generally coatings do not stick to greasy, oily, waxy surfaces. This includes many kinds of plastic surfaces. Oily surfaces can be tricky, Just grinding the surface is often not good enough, as oil within the concrete is bound to rise to the surface before the primer has the chance to stick. Even on what seems like a non-greasy surface, many coatings will ‘bead-up’ leaving behind hollow, coating-less circles or voids.
d. Check for dust, salts etc: This is one of the neglected steps and can lead to disastrous consequences. The coating may stick to the dust but not to the base floor and can lead to debonding. Salts and/or minerals either deposited out on the surface from the curing of fresh concrete, or from the evaporation of seawater on concrete or steel can quickly ruin a coating.
All the above pre-installation steps are very important activities that should not be ignored to ensure a long-lasting epoxy/flooring solution.
In an upcoming article, we will enumerate the installation procedures and post-installation practices.
Authored – B.M.Nagarajan, Director, Neocrete Technologies Pvt. Ltd.
For more details, visit – www.neocrete.co.in
